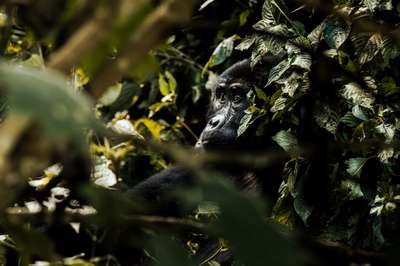
Gorilla photography in Bwindi is challenging — no flash allowed, low forest light, and unpredictable subjects. A camera with good high-ISO performance (mirrorless or DSLR) and a fast 70–200mm f/2.8 lens gives the best results. Use Auto ISO with a minimum shutter speed of 1/200s. Burst mode, silent shutter, and keeping your movements slow and quiet are as important as gear.
Quick Facts
- Flash:
- Strictly prohibited
- Recommended Lens:
- 70–200mm f/2.8 or 100–400mm
- Minimum Shutter Speed:
- 1/200s (gorillas move fast)
- ISO Range:
- 1600–12800 depending on conditions
- Aperture:
- Wide open (f/2.8–f/4) for light gathering
- Shooting Mode:
- Aperture priority or Manual with Auto ISO
- Rain Protection:
- Waterproof cover essential
- Closest Approach:
- 7 meters (UWA rule)
The Challenge: Why Gorilla Photography Is Hard
Photographing mountain gorillas in Bwindi Impenetrable Forest pushes every camera system to its limits. The forest canopy blocks most available light, creating a dappled, low-contrast environment where exposure is unpredictable and shadows are deep. On overcast days — which are frequent in Bwindi — light levels can drop to the equivalent of dusk even at midday.
Flash is strictly prohibited throughout the gorilla encounter. The Uganda Wildlife Authority enforces this rule to protect the gorillas from stress and preserve the long-term viability of the habituation program. Every image you take must be captured with available light alone, regardless of conditions.
Gorillas are active, fast-moving subjects. A silverback turning his head, a juvenile leaping between branches, or a mother shifting her infant requires a shutter speed fast enough to freeze the motion — typically 1/200s as a minimum, and 1/400s or faster for action shots. Combining fast shutter speeds with wide apertures in very low light forces ISO values into territory that challenges lesser camera systems.
The 7-meter minimum approach distance required by UWA means you cannot get close enough for frame-filling portraits with a standard kit lens. A telephoto zoom is not optional — it is a necessity for meaningful gorilla images. All of these constraints make preparation and gear selection matter more here than in almost any other wildlife photography context.
Camera and Lens Recommendations
The single most important factor in gorilla photography is your camera's high-ISO performance. A full-frame mirrorless or DSLR with a large sensor — Sony A7 series, Canon R5/R6, Nikon Z6/Z7, or equivalent — produces clean, usable images at ISO 6400 and even ISO 12800. Crop-sensor cameras from the same manufacturers perform well at ISO 3200–6400. Compact cameras and budget bodies struggle significantly above ISO 800.
Lens Focal Lengths and Why They Matter
At the 7-meter minimum distance, a 200mm lens on a full-frame camera produces a frame-filling portrait of an adult gorilla. A 70–200mm zoom gives you flexibility from environmental shots at the wide end to tight portraits at 200mm. This is the most versatile choice for gorilla trekking.
A 100–400mm or 150–600mm zoom provides more reach for distant gorillas or tight facial details, but the slower maximum aperture (typically f/5.6–f/6.3 at the long end) is a significant disadvantage in low forest light. You will need two to three stops more ISO compared to shooting at f/2.8, which increases noise substantially.
The f/2.8 advantage is not subtle. Compare f/2.8 to f/5.6: f/2.8 lets in four times as much light, allowing you to shoot at ISO 1600 where an f/5.6 lens would require ISO 6400. Over a one-hour encounter with constantly changing light, this difference translates directly into sharper, cleaner images.
On crop-sensor cameras (APS-C), a 70–200mm lens covers an equivalent field of view of approximately 105–300mm, which is excellent. Many wildlife photographers use this combination specifically for gorilla trekking. Image stabilization (Canon IS, Nikon VR, Sony OSS) helps reduce camera shake but does not freeze subject movement — shutter speed remains the critical variable.
Mirrorless vs DSLR vs Smartphone
Modern mirrorless cameras have two key advantages over DSLRs for gorilla photography: silent electronic shutter eliminates shutter noise that can disturb the gorillas, and in-body image stabilization (IBIS) on many models adds additional stability at lower shutter speeds. DSLRs remain fully capable — the Canon 5D series and Nikon D850 are excellent choices if you already own one.
Smartphones can produce impressive results under the right conditions. The latest flagship devices — iPhone Pro, Samsung Galaxy S Ultra, Google Pixel — handle low light better than any previous generation of mobile cameras. They are a legitimate option for travelers who do not want to carry heavy gear, with the understanding that they perform best when light is adequate and subjects are relatively still.
Camera Settings for the Gorilla Encounter
Configure your camera before you reach the gorillas. Once the encounter begins, you will not have time to navigate menus. The following settings work well across a wide range of forest light conditions.
Aperture Priority with Auto ISO
Set your camera to Aperture Priority (Av on Canon, A on Nikon/Sony). Choose your widest aperture — f/2.8 if your lens allows it, f/4 otherwise. Enable Auto ISO and set the maximum to 12800. Set the minimum shutter speed to 1/200s. This combination tells the camera: keep the aperture wide open, never drop below 1/200s, and raise ISO as high as needed to achieve correct exposure.
When a gorilla is stationary or moving slowly, you may want to allow a lower minimum shutter speed (1/125s) to keep ISO lower. When action starts — juveniles playing, a silverback moving through undergrowth — raise the minimum shutter speed to 1/400s or 1/500s. Knowing when to make this adjustment comes with experience, but erring toward faster shutter speeds preserves more shots.
Burst Mode and Silent Shutter
Enable continuous shooting (burst mode) and keep your finger on the shutter during key moments. Gorilla expressions and eye contact shots last fractions of a second. Shooting 5–10 frames at once gives you the best chance of capturing the decisive moment. You can delete the unusable frames later.
If your camera has a silent electronic shutter, use it. The absence of mechanical shutter noise reduces disturbance to the gorillas and allows you to shoot discreetly. Some photographers report that repeated shutter clicks from a group of trekkers causes gorillas to look away or move — silent shooting mitigates this.
Autofocus and Back-Button Focus
Set autofocus to continuous tracking mode (AI Servo on Canon, AF-C on Nikon/Sony). This keeps the focus point locked on a moving subject as long as you hold the shutter halfway. If your camera offers subject-detection or animal-eye autofocus, enable it — modern systems are remarkably effective at tracking primate eyes through vegetation.
Back-button focus separates the autofocus activation from the shutter button. Assign AF to a rear button (AF-ON) and set the shutter button to only fire the shutter without starting autofocus. This allows you to lock focus on a stationary gorilla, then reframe and shoot multiple times without the camera refocusing on background foliage each time. It is a small adjustment that meaningfully improves keeper rate in complex forest scenes.
Protecting Your Gear
Bwindi is a rainforest. Rain can arrive without warning at any time of year, and even in dry seasons the forest itself stays wet from moisture dripping through the canopy. Camera gear is a significant investment, and protecting it should be a deliberate part of your preparation.
Carry a dedicated camera rain cover in your day pack. Inexpensive neoprene covers or plastic rain sleeves designed for telephoto lenses cost very little and protect thousands of dollars of equipment. The cover should go on as soon as rain starts, not after your camera has already been exposed.
Pack at least two microfibre lens cloths in easily accessible pockets. Water drops on the front element destroy sharpness immediately. The ability to wipe the lens quickly between shots — without removing the rain cover from the rest of the camera — is a practical skill that separates prepared photographers from those returning with hazy, spotted images.
Your camera bag or backpack should have a built-in rain cover or be lined with a dry bag. Lenses left in a damp bag accumulate internal moisture, and repeated exposure can lead to fungal growth on lens elements — a costly and sometimes irreparable problem.
For multi-day trips, silica gel packets placed inside your camera bag help manage humidity overnight. Dry your equipment thoroughly on returning to your lodge each day. If your lodging has heating, a brief period in a warm, dry room helps draw moisture from weather-sealed camera bodies and lenses.
Composition and Technique
Patience is the single most important compositional tool in gorilla photography. You have one hour with the group. Spend the first minutes observing and identifying which individuals are most active, which are closest, and where the light falls best. Resist the urge to shoot everything immediately — your best shots will often come in the final twenty minutes of the encounter when you understand the group's movements.
Eye Contact Shots
Direct eye contact with a gorilla produces the most powerful images. To get it, you need to be patient, still, and at the right angle. Lower your camera to gorilla eye level when possible — even crouching slightly changes the perspective from a human looking down to something closer to equals. When a gorilla looks in your direction, raise the camera slowly and shoot a burst. These moments are brief but they are worth waiting for.
Environmental Shots
Not every frame needs to be a tight portrait. Pull back to 70–100mm and include the forest environment — the dense vegetation, shafts of light through the canopy, a gorilla partially obscured by leaves. These contextual images tell the story of the habitat and provide variety in your final collection. They are often more evocative than straight portraits.
Baby Gorillas and Silverback Portraits
Juvenile and infant gorillas are irresistibly photogenic and far more active than adults. Watch for them playing, climbing, or interacting with their mothers. These sequences require fast shutter speeds (1/400s+) and burst mode. Keep your focus on the eyes — an image of a baby gorilla with sharp eyes and a soft background is one of the most sought-after results from any trekking session.
Silverback portraits benefit from the longest focal length you have. Fill the frame with the face, focus on the eyes, and expose for the skin tones rather than the dark fur. The contrast between black fur and lighter face skin can fool the camera's metering — use spot metering on the face or apply +0.3 to +0.7 stops of exposure compensation to retain facial detail.
Smartphone Photography Tips
If you are trekking without a DSLR or mirrorless camera, a modern flagship smartphone is a capable alternative. The key is working with the smartphone's strengths and compensating for its limitations.
Use Night Mode or Low Light mode if available — most flagship devices now include this as an automatic option in low-light scenes. Night Mode works by combining multiple exposures, which means subjects must be relatively still during the capture. It works well for resting gorillas but poorly for active juveniles.
On iPhones, open the Camera app and use the telephoto lens (2x or 3x optical) rather than digital zoom. Digital zoom degrades quality significantly; optical zoom uses a physically separate lens element and maintains resolution. On Samsung Galaxy devices, the Space Zoom feature uses AI-assisted optical stabilization — it performs well at 3x but degrades rapidly above 10x.
If your phone supports Pro Mode or Manual Mode, set ISO manually to 800–1600 and adjust shutter speed to 1/200s or faster. Auto mode often chooses too slow a shutter speed in low light, resulting in motion blur. Taking manual control produces consistently sharper results.
Stabilize the phone against your body — hold your elbows tight against your ribcage rather than extending your arms. Even a small reduction in camera shake at these focal lengths and shutter speeds produces noticeably sharper images. If foliage or branches allow it, brace the phone against a stable surface while composing.
Related Guides
What to Pack
Complete day pack checklist including camera gear
What to Expect
The full gorilla trekking experience
Gorilla Trekking FAQ
25+ questions answered